How to install an isolated WordPress development environment with Docker

I am a freelance UK full-stack web developer with a few decades experience.
More than 40% of all sites run the WordPress Content Management System. As a web developer, you’re almost certain to have encountered it.
WordPress requires Apache, PHP, MySQL, and the WordPress source code. A lot of dependencies are required for your development environment.
You could choose to install the applications:
- directly on your local PC,
- using an all-in-one package such as XAMPP, or
- within a Virtual Machine.
These options take time and there’s no guarantee you’ll be able to match the versions of each dependency used on your live server. You may also encounter issues running two or more sites, especially if you require different editions of PHP or MySQL.
Install WordPress with Docker
Docker solves WordPress woes. It can:
- install all dependencies in minutes on any OS
- launch older editions of MySQL 5 preferred by the CMS
- run WordPress quickly — faster than native Windows
- permit local file editing using your preferred tools, and
- create a fully-isolated development environment for each site.
Make sure you have Docker and Docker Compose installed then create a new project directory, e.g.
mkdir wpsite
cd wpsite
Create a new file named docker-compose.yml with the following content:
version: '3'
services:
mysql:
image: mysql:5
container_name: mysql
environment:
  - MYSQL\_DATABASE=wpdb
  - MYSQL\_USER=wpuser
  - MYSQL\_PASSWORD=wpsecret
  - MYSQL\_ROOT\_PASSWORD=mysecret
volumes:
  - wpdata:/var/lib/mysql
ports:
  - "3306:3306"
networks:
  - wpnet
restart: on-failure
wordpress:
image: wordpress
container_name: wordpress
depends_on:
  - mysql
environment:
  - WORDPRESS\_DB\_HOST=mysql
  - WORDPRESS\_DB\_NAME=wpdb
  - WORDPRESS\_DB\_USER=wpuser
  - WORDPRESS\_DB\_PASSWORD=wpsecret
volumes:
  - wpfiles:/var/www/html
  - ./wp-content:/var/www/html/wp-content
ports:
  - "8001:80"
networks:
  - wpnet
restart: on-failure
volumes:
wpdata:
wpfiles:
networks:
wpnet:
(The tabs and spacing is important. Port *8001* can be changed if it conflicts with another application.)
Now run docker-compose up from your terminal to launch WordPress. It will take several minutes on the first run since all dependencies are downloaded and initialized.
A new wp-content sub-directory will appear in your project folder. This contains the WordPress theme and plugin code you can edit and test. Those using Linux, macOS, and Windows WSL2 will find it's been created by the root user. Grant read and write privileges to you and WordPress by running this command in another terminal:
sudo chmod 777 -R wp-content
Open http://localhost:8001/ in your browser and follow the WordPress installation process:
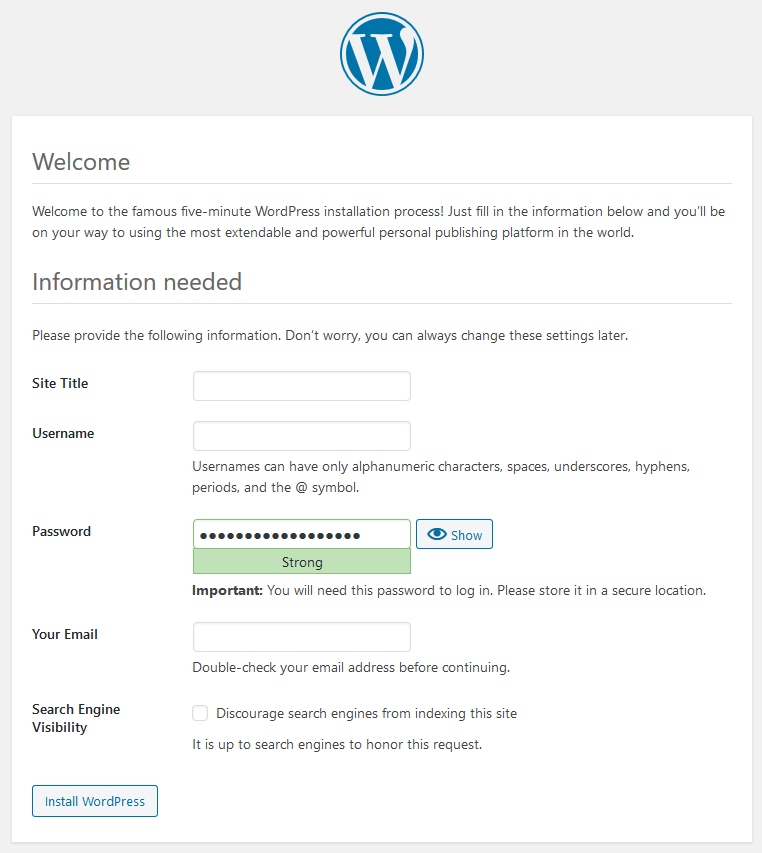
WordPress installation screen
You will then be prompted to log on at http://localhost:8001/wp-admin using the ID and password you chose during installation:
WordPress dashboard
You can now create content and edit themes as you would do for any other WordPress installation.
Back-up WordPress data
Code in your wp-content sub-directory can be backed-up or added to version control.
WordPress database data is stored in a Docker volume named wpdata mounted in the mysql container. You can export the data to a file using the WordPress Export option in the Tools menu.
Alternatively, you can back-up the data using mysqldump. First, find the ID Docker Compose assigned to the MySQL container:
docker container ls
A name similar to wpsite_mysql should appear in the list. Use this in place of <ID> in the following Linux/macOS command run from another terminal:
docker exec /usr/bin/mysqldump -u root -pmysecret mydb > backup.sql
The equivalent command on Windows PowerShell:
docker exec <ID> /usr/bin/mysqldump -u root -pmysecret -r mydb | Set-Content backup.sql
The root user and mysecret password will need to be changed if you used different credentials in the docker-compose.yml file.
Shutdown WordPress
To shutdown WordPress, enter docker-compose down in another terminal window. Starting again with docker-compose up will be almost instantaneous and the application will be in the same state you left it.
“Docker for Web Developers” provides futher information about running WordPress with Docker and explains how to add and develop your own custom theme.
Do you want an easy-to-follow course which demonstrates how to use Docker and create practical web development environments on your Windows, macOS, or Linux PC?
Buy the “Docker for Web Developers” book & video course…
Originally published at https://dockerwebdev.com on April 13, 2021.