Form Validation Using JavaScript’s Constraint Validation API

I am a freelance UK full-stack web developer with a few decades experience.
Learn how to create great form validations using JavaScript’s native API
Form validation is one of the primary reasons to use client-side JavaScript. It can prevent user entry errors before your app attempts to submit data to the server. But…
client-side validation is not a substitute for server-side validation!
Always check incoming user data on the server. Not every request will come from a browser nor will every browser run validation code. Client-side validation is an enhancement which makes your system nicer to use.
That said, you may not require JavaScript for simpler form validation…
HTML5 Field Validation
Modern HTML5 browsers can validate fields without JavaScript. A type attribute sets a constraint and can alter the UI of a standard input field:
buttonbutton with no default behaviorcheckboxcheckboxcolorcolor pickerdatedate picker for the year, month, and daydatetime-localdate and time pickeremailemail entryfilefile pickerhiddenhiddenimagebutton which displays an image defined in the src attributemonthmonth and year pickernumbernumber entrypasswordpassword entry (obscured text)radioradio buttonrangeslider controlresetresets all form inputs to default values (please avoid)searchsearch entrysubmitform submit buttonteltelephone numbertexttext entrytimetime picker (no time zone)urlURL entryweekweek number and year picker
The browser assumes text when you omit or use an unsupported type attribute. This should allow a user to enter something in older browsers even if it cannot be automatically validated.
Other constraint control attributes include:
acceptfile upload typealtalt attribute for the imageimageautocompleteauto-completion hintautofocusfocus fieldcapturemedia capture methodcheckedcheck checkbox or radiodisableddisable field - it’s not validated or submittedformassociate with a form using this idformactionURL for submission (submit and image buttons)inputmodedata type hint (none, text, tel, url, email, numeric, decimal, search)listid of <datalist>
maxmaximum valuemaxlengthmaximum string lengthminminimum valueminlengthminimum string lengthnamename of control (submitted to server)patternvalidation pattern regular expression, e.g. [1-3]+ one or more digits from 1 to 3placeholderplaceholder text for empty fieldsreadonlyfield cannot be edited - it’s validated and submittedrequiredthe field is requiredsizethe size of the control usually overridden in CSSspellcheckset true or false for spell-checkingsrcimage URLstepincremental values in numbers and rangesvaluethe initial value
Input Interfaces
Field types and constraint attributes can change the browser’s UI behaviour. A number input shows a numeric keyboard on mobile devices and may also display a spinner or allow up/down cursor presses to increment and decrement values.
Use the most obvious type but be wary of special cases like credit cards. These are numeric but the spinner and keyboard cursor keys are not helpful. It's better to use a standard text input:
The browser may offer features such as camera scanning or SMS confirmation when it encounters the autocomplete type.
Built-In Validation
The browser ensures a value adheres to constraints defined by the type, min, max, step, minlength, maxlength, pattern, and required attributes:
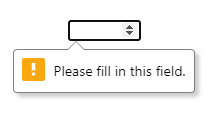
Attempting to submit an empty, invalid, or out-of-range value stops form submission and shows a generic error message:
You can stop the browser’s default validation by adding:
- a
novalidateattribute to the<form>, or - a
formnovalidateattribute to the submission button/image<input>.
CSS Validation Styles
The following pseudo-classes allow you to style inputs according to their state:
:focusthe field with focus:focus-withinan element contains a field with focus:focus-visiblean element has focus owing to keyboard navigation:requireda field with a required attribute:optionala field without a required attribute:valida field that has passed validation:invalida field that has not passed validation:user-valida field that has passed validation after a user interaction (Firefox only):user-invalida field that has not passed validation after a user interaction (Firefox only):in-rangethe value is within range on a number or range input:out-of-rangethe value is out of range on a number or range input:disableda field with a disabled attribute:enableda field without a disabled attribute:read-onlya field with a read-only attribute:read-write:a field without a read-only attribute:checkeda checked checkbox or radio button:indeterminatean indeterminate checkbox or radio state:defaultthe default submit button or image
These selectors have the same specificity so order can be important. For example:
input:invalid { color: red; }
input:enabled { color: blue; }
Invalid inputs have red text — but this is overridden because all non-disabled inputs are blue.
You should also be wary that the browser applies validation styles on page load. The following example shows every field with red text and a red border before the user has had a chance to interact with the form:
:invalid {
color: red;
border-color: red;
}
In general, it’s preferable to show error messages and colors after the user has interacted with a field or attempted to submit the whole form.
The Constraint Validation API
The Constraint Validation API provides customization options which can enhance or modify standard HTML5 field checking behavior. You can perform validation after user interaction, show specific error messages, or implement programmatic validation, e.g. confirm that:
- new and confirmation password fields match
- one date comes after another
- the user has entered a telephone number, an email address, or both.
The following sections describe a general approach to using the Constraint Validation API in your own code.
1. Disable Default Form Validation
Your code should disable default HTML5 form validation and error messages by setting the <form> noValidate property/attribute to true, e.g.
const myform = document.getElementById('myform');
myform.noValidate = true;
2. Add Form Event Handlers
You should then add event handlers for form submits or individual field changes as necessary, e.g.
// validate form on submit
myform.addEventListener('submit', validateForm);
The handler function can check the whole form is valid using the form element methods:
checkValidity()- returnstrueif all child controls are subject to constraint validation and satisfy the constraintsreportValidity()- returnstrueif a child control is not subject to constraint validation or it satisfies the constraints.
Note that both methods trigger an [invalid](https://developer.mozilla.org/docs/Web/API/HTMLInputElement/invalid_event) event on every invalid field. It does not bubble so handlers must be set on every field as necessary.
This simple handler function stops the form submitting when one or more fields are invalid:
// validate form on submission
function validateForm(e) {
const form = e.target;
if (!form.checkValidity()) {
// form is invalid - cancel submit
e.preventDefault();
e.stopImmediatePropagation();
}
};
3. Validate Individual Fields
Individual fields have the following constraint validation properties and methods:
willValidate— Returnstruewhen an element is subject to constraint validation.validationMessage— The validation message — an empty string when a field is valid.valitity— A ValidityState object with avalidproperty settrueorfalse. Invalid fields have one or more of the following properties settrue:.badInputthe browser cannot understand the input.customErrora custom validity message has been set.patternMismatchthe value does not match the specifiedpatternattribute.rangeOverflowthe value is greater than themaxattribute.rangeUnderflowthe value is less than theminattribute.stepMismatchthe value does not fitstepattribute rules.tooLongthe string length is greater than themaxlengthattribute.tooShortthe string length is less than theminlengthattribute.typeMismatchthe value is not a valid email or URL.valueMissingarequiredvalue is emptysetCustomValidity(message)— Sets an error message for an invalid field. Pass an empty string when the field is valid or it remains invalid forever.checkValidity()— Returnstruewhen the input is valid. This is similar to checking thevalitity.validproperty but also triggers aninvalidevent on the field if necessary.
The validateForm() handler function could loop through every field and apply an invalid class to its parent element:
function validateForm(e) {
const
form = e.target,
field = Array.from(form.elements);
// apply/remove invalid class
field.forEach(i => {
if (i.checkValidity()) {

  // field is valid - remove class
  i.parentElement.classList.remove('invalid');

}
else {

  // field is invalid - add class
  i.parentElement.classList.add('invalid');

}
});
if (!form.checkValidity()) {
// form is invalid - cancel submit
e.preventDefault();
e.stopImmediatePropagation();
}
};
If you defined a required email field in your HTML5 form:
Please enter a valid email address.
The script applies an invalid class to the container <div> when the email is not valid. CSS can alter the styling and show or hide the error message:
.help { display: none; }
.invalid .help { display: block; }
.invalid label, .invalid input, .invalid .help {
color: red;
border-color: red;
}

4. Add Custom Field Validation
This CodePen demonstration shows an example contact form with name (required), email, and telephone fields. Validation occurs on submit and the form is considered valid when the name and either the email and/or the telephone have valid values:

The validateForm() function below:
- resets each field’s validity message and parent error styling
- passes a non-empty string to the email and telephone field
.setCustomValidity()method when both are not defined, and - applies the
invalidclass to the parent element of all invalid fields.
// form validation
function validateForm(e) {
const
form = e.target,
field = Array.from(form.elements);
// reset fields
field.forEach(i => {
i.setCustomValidity('');
i.parentElement.classList.remove('invalid');
});
// email or tel set?
const err = form.email.value || form.tel.value ? '' : 'error';
form.email.setCustomValidity(err);
form.tel.setCustomValidity(err);
if (!form.checkValidity()) {
// form is invalid - cancel submit
e.preventDefault();
e.stopImmediatePropagation();

// apply invalid class
field.forEach(i => {

  if (!i.checkValidity()) {

    // field is invalid - add class
    i.parentElement.classList.add('invalid');

  }
});
}
}
Open Source Session Replay
Debugging a web application in production may be challenging and time-consuming. OpenReplay is an Open-source alternative to FullStory, LogRocket and Hotjar. It allows you to monitor and replay everything your users do and shows how your app behaves for every issue. It’s like having your browser’s inspector open while looking over your user’s shoulder. OpenReplay is the only open-source alternative currently available.

Happy debugging, for modern frontend teams — Start monitoring your web app for free.
Summary
Form validation can be mundane but it’s a necessary web development activity. However, the days of writing your own email regular expressions and numeric checkers are long gone. Use the standard HTML input types then apply JavaScript enhancements with the Constraint Validation API when necessary.
Finally: never forget to validate user data on the server!
Originally published at https://blog.openreplay.com on January 10, 2022.